Automatically Redirect HTTP requests to HTTPS on IIS 6
This article is for IIS 6 for the IIS 7 please refer to this article.
If you configure IIS to only allow https connections, a user will get a 403.4 error when attempting to access the page via http. To fix this problem we create a custom 403.4 page that redirects http requests to https. We will be changing this configuration in a couple of steps:
Step 1 - Verify SSL is required for the selected site
Step 2 - Create a HttpRedirect.htm file and save it to C:\InetPub
Step 3 - Set the 403.4 error page to use this file instead of the regular error file
Step 4 – Test
Step 2 - Create a HttpRedirect.htm file and save it to C:\InetPub
Step 3 - Set the 403.4 error page to use this file instead of the regular error file
Step 4 – Test
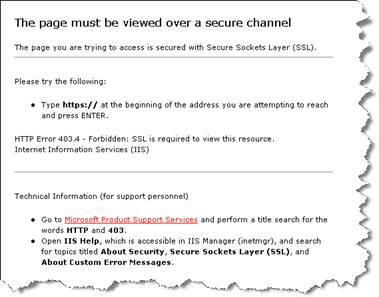
This is a standard 403.4 error message file provided out of the box with IIS.
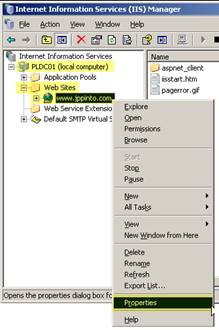
Step 1 – Verify SSL is required for the selected site
1) Open IIS Manager (Start Menu\Programs\Administrative Tools or %SystemRoot%\system32\inetsrv\iis.msc)
2) Expand the Computer Name
3) Expand Web Sites
4) Right click the web site we wish to modify
5) Select “Properties”
2) Expand the Computer Name
3) Expand Web Sites
4) Right click the web site we wish to modify
5) Select “Properties”
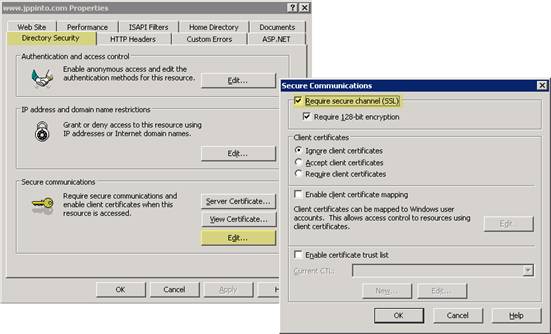
6) Select the “Directory Security” tab
7) Select “Edit” in the Secure Communications section
8) Check off the “Require secure channel (SSL)” option. (This will only allow pages on this site to be viewed only with https.)
9) Press OK and close all Properties windows
7) Select “Edit” in the Secure Communications section
8) Check off the “Require secure channel (SSL)” option. (This will only allow pages on this site to be viewed only with https.)
9) Press OK and close all Properties windows
Step 2 – Create a HttpRedirect.htm file and save it to C:\InetPub
We will be creating an HTM file containing the following code. We will save this file to C:\Inetpub.
1) Open Notepad and copy in the following code below
2) Go to File > Save as and save this file as HttpRedirect.htm, and save the file to C:\Inetpub directory.
2) Go to File > Save as and save this file as HttpRedirect.htm, and save the file to C:\Inetpub directory.
You can download a copy of this file here: HttpRedirect.zip
1
2
3
4
5
6
7
8
9
10
11
12
13
14
15
16
17
18
19
20
21
| <!-- beginning of HttpRedirect.htm file --><script type="text/javascript">function redirectToHttps(){var httpURL = window.location.hostname+window.location.pathname;window.location = httpsURL ;}redirectToHttps();</script><!-- end of HttpRedirect.htm file --> |
Step 3 – Set the 403 error page to use this file instead of the regular error file
1) Expand the Computer Name
2) Expand Web Sites
3) Right click the web site you wish to modify
4) Select “Properties”
2) Expand Web Sites
3) Right click the web site you wish to modify
4) Select “Properties”
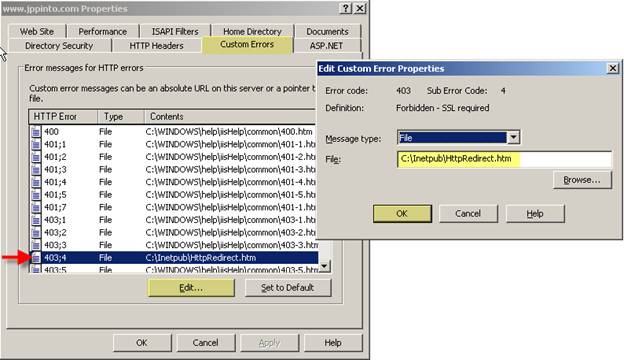
5) Select “Custom Errors” Tab
6) Select the “403;4″ error
7) Press the “Edit” button
8) Browse to and Select the HttpRedirect.htm file in C:\Inetpub
9) Press OK and close all Properties windows
6) Select the “403;4″ error
7) Press the “Edit” button
8) Browse to and Select the HttpRedirect.htm file in C:\Inetpub
9) Press OK and close all Properties windows
Step 4 – Test
1) Bring up a web browser and try to access the site by https, verify that this is working ok
2) Try to access the site via http now. You should see the browser change the http:// to https://
2) Try to access the site via http now. You should see the browser change the http:// to https://