Monday 26 November 2012

How to enable Network Level Authentication for Remote Desktop on Windows XP

How to enable Network Level Authentication for Remote Desktop on Windows XP


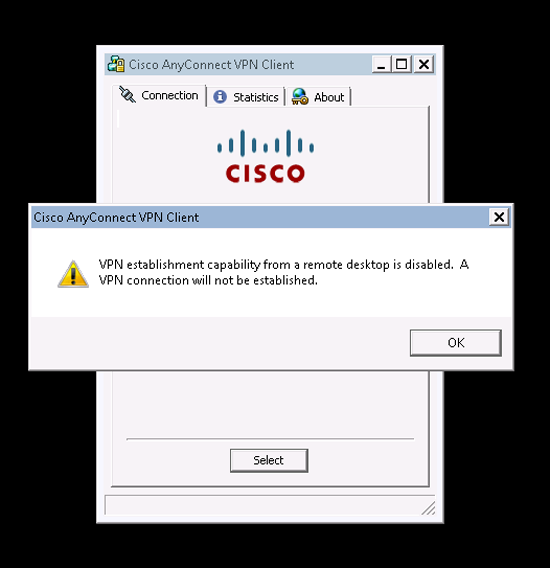
When connecting to a Windows Server 2008 or newer remote host using remote desktop, you get an error saying that "The remote computer requires Network Level Authentication, which your computer does not support."

To enable Network Level Authentication (NLA) on Windows XP you need to do the following:

1.     Install Service Pack 3.

2.     Click Start->Run, type regedit and then press enter
In the left pane, navigate to HKEY_LOCAL_MACHINE\SYSTEM\CurrentControlSet\Control\Lsa
In the right pane, double click "Security Packages", this brings up a dialog box to modify the values, leave all existing values as they are, and at the end of the list add "tspkg", and click OK.

3.     In the left pane, navigate to HKEY_LOCAL_MACHINE\SYSTEM\CurrentControlSet\Control\SecurityProviders, and in the right pane double click SecurityProviders, and in the dialog box, add "credssp.dll" to the end, be sure that if the list that is present currently is separated by commas, that you add a comma to the value immediately before the "credssp.dll" that you just added. Click OK to save your changes.

4.     Exit the registry editor and restart your computer.

5.     Reattempt your remote desktop connection.

Monday 19 November 2012

How to install the vSphere Client 5.0


How to install the vSphere Client 5.0

If you’re considering a machine with Windows 8, you may notice that the installer for VMware vSphere client 5.01a (latest release) complains that it can only be installed on “Windows XP SP2 or higher” and quits. For now, here’s the work-around I used:
  1. Use 7-zip to open the ~350MB executable and extract the contents
  2. In Windows 8, run dotnetfx35.exe – it will prompt you to download and install .NET 2.0. I let it download and install the files it needed.
  3. Next, run vjredist64.exe (Assuming Windows 8 x64)
  4. Right-Click VMware-viclient.exe, choose “Properties”
  5. On the “Compatibility” tab, check the “Run this program in compatibility mode for:” and choose “Windows 7″ from the list. Click “Ok”
  6. Run the VMware-viclient installer as you normally would.

Windows8 vSphere Client Compatibility Settings
Windows8 vSphere Client 5.01a Compatibility Settings

Wednesday 7 November 2012

How to configure Read Receipt request in Outlook 2007

How to configure Read Receipt request in Outlook 2007

 
There is more issues with Read Receipt. People do not like if, with every email received they have to do something more than just read it. They can feel like "You do not trust them". Many Companies switch this option OFF by default. Remember this before You start using it.
I will describe two solutions:
I. Setup of Read Receipt Request for all sent emails.
II. Setup of Read Receipt Request for certain (Important) emails.
Personally I prefer the Second solution. Also, You can always put a Red Importance mark which will draw your recipient's attention to it. But of course it is your own choice.

I. Setup of Read Receipt Request for all sent emails.

1. In Microsoft Outlook go to menu " Tools /Options.. "
Microsoft Outlook 2007 Options.
2. On preferences page click on " E-mail Options... "

3. In E-mail Options Click on " Tracking Options.... "

4. In Tracking Options Under " For all messages I send, request: " Check box next to " Read receipt "
5. Click " OK " on all screens to Confirm changes.

II. Setup of Read Receipt Request for certain (Important) emails.

1. Open New Message ( CTRL+N)

2. Click on the circle office button in the left top corner and go to Properties.

3.On the general tab You can check box next to " Read receipt request " option and/or change " Importance " from Normal to High.

Monday 5 November 2012

'VPN establishment capability from a remote desktop is disabled.

AnyConnect - 'VPN establishment capability from a remote desktop is disabled. A VPN connection will not be established'

Problem

If you connect to to a client via RDP then try and run the AnyConnect client you will see this error.
This, behaviour is default, and despite me trawling the internet to find a solution (most posts quote changing the local AnyConnectProfile.tmpl file, this file does not exist using Version 3 (I was using v 3.0.4235).

Solution

To solve this problem we need to create an AnyConnect profile, load the profile into the firewall, then associate that profile with your AnyConnect group policy.
1. First download the AnyConnect Profile Editor from Cisco. (Note: You will need a valid CCO account and a registered support agreement/SmartNet).
If you cannot download the software here's a profile (I've already created) you can use. If you are going to use this, jump to step 5.
anyconnect profile editor
2. Once you have installed the profile editor, launch the "VPN Profile Editor".
vpn profile editor
3. The setting we want is listed under Windows VPN Establishment, and needs setting to "AllowRemoteUsers", In addition I'm going to set Windows Logon Enforcement to "SingleLocalLogon".
AllowRemoteUsers: Lets remote users bring up the VPN, if this forces routing to disconnect you, it will auto terminate the VPN.
SingleLocalLogon: Allows multiple remote logons but only one local logon.
anyconnect profiel editor allowremoreusers
4. Save the profile somewhere you can locate it quickly.
create anyconnect profile
5. Connect to the firewalls ASDM > Tools > File Management > File Transfer > Between Local PC and Flash.
upload anyconnect profile
6. Browse your local PC for the profile you created earlier > Hit the "Right Arrow" to upload it > This can take a few minutes, depending on your proximity to the firewall.
enforce anyconnect settings
7. Make sure the file uploads correctly > Close.
ssl vpn settings
8. To associate this profile with your AnyConnect//SSL Group Policy, click Configuration > Remote Access VPN > Network (Client) Access > Group Policies > Locate the policy in use for your AnyConnect clients > Edit > Advanced > SSL VPN Client > Locate the "Client Profile to Download" section and uncheck the inherit button.
enforce profile with anyconnect
9. Click New > Browse Flash > Locate the profile you uploaded earlier.
10. OK > OK > Apply > Save the changes by clicking File > Save running configuration to flash.
11. Then reconnect with your AnyConnect Mobility Client software.